How to Upgrade Your Toyota Vellfire or Alphard with an Audiosources Android Head Unit
Upgrading your Toyota Vellfire or Alphard with an Audiosources Android Head Unit is the ultimate Vellfire Alphard Upgrade to Android head unit, revolutionizing your driving experience. This cutting-edge system introduces advanced features like wireless Apple CarPlay, Android Auto, and GPS navigation directly to your dashboard. Enjoy a vibrant, ultra-bright screen that improves both visibility and usability. With Bluetooth hands-free calling and internet connectivity, staying connected on the go has never been easier. As Top Gs Tech states,
"Installing a modern car Android head unit is not just about keeping up with the times; it’s about enhancing your driving experience in ways you never thought possible."
This Vellfire Alphard Upgrade to Android head unit is not just a functional enhancement—it’s a transformative upgrade for your vehicle.
Key Takeaways
Upgrading to an Audiosources Android Head Unit enhances your driving experience with features like wireless Apple CarPlay, Android Auto, and GPS navigation.
Ensure you have the right tools, such as screwdrivers, trim removal tools, and a wiring harness adapter, to facilitate a smooth installation process.
Confirm compatibility by checking your vehicle's model year and dashboard layout before purchasing the head unit to avoid installation issues.
Follow a step-by-step guide for removing the factory head unit and installing the new one, ensuring all connections are secure for optimal performance.
Regularly update the firmware of your Android head unit to maintain performance and access new features, while also backing up your settings beforehand.
Keep the touchscreen clean and protected with a microfiber cloth and screen protector to enhance visibility and extend its lifespan.
Testing all features after installation, including multimedia functions and connectivity, ensures a fully functional and enjoyable driving experience.
Tools and Preparation for Vellfire Alphard Upgrade to Android Head Unit

Upgrading your Toyota Vellfire or Alphard with an Audiosources Android Head Unit requires proper preparation. Gathering the right tools and ensuring compatibility with your vehicle are essential steps to make the process smooth and efficient. This section will guide you through everything you need to get started.
Tools and Materials Needed
Before beginning the installation, you should have all the necessary tools and materials ready. This ensures that you can complete the upgrade without interruptions. Here’s a list of what you’ll need:
Screwdrivers: A set of Phillips and flathead screwdrivers for removing screws and panels.
Trim Removal Tools: Plastic trim tools to safely remove dashboard panels without causing damage.
Wiring Harness Adapter: Ensures seamless connection between the new head unit and your vehicle’s wiring system.
Electrical Tape: For securing connections and preventing loose wires.
Multimeter: Useful for checking electrical connections and ensuring proper voltage.
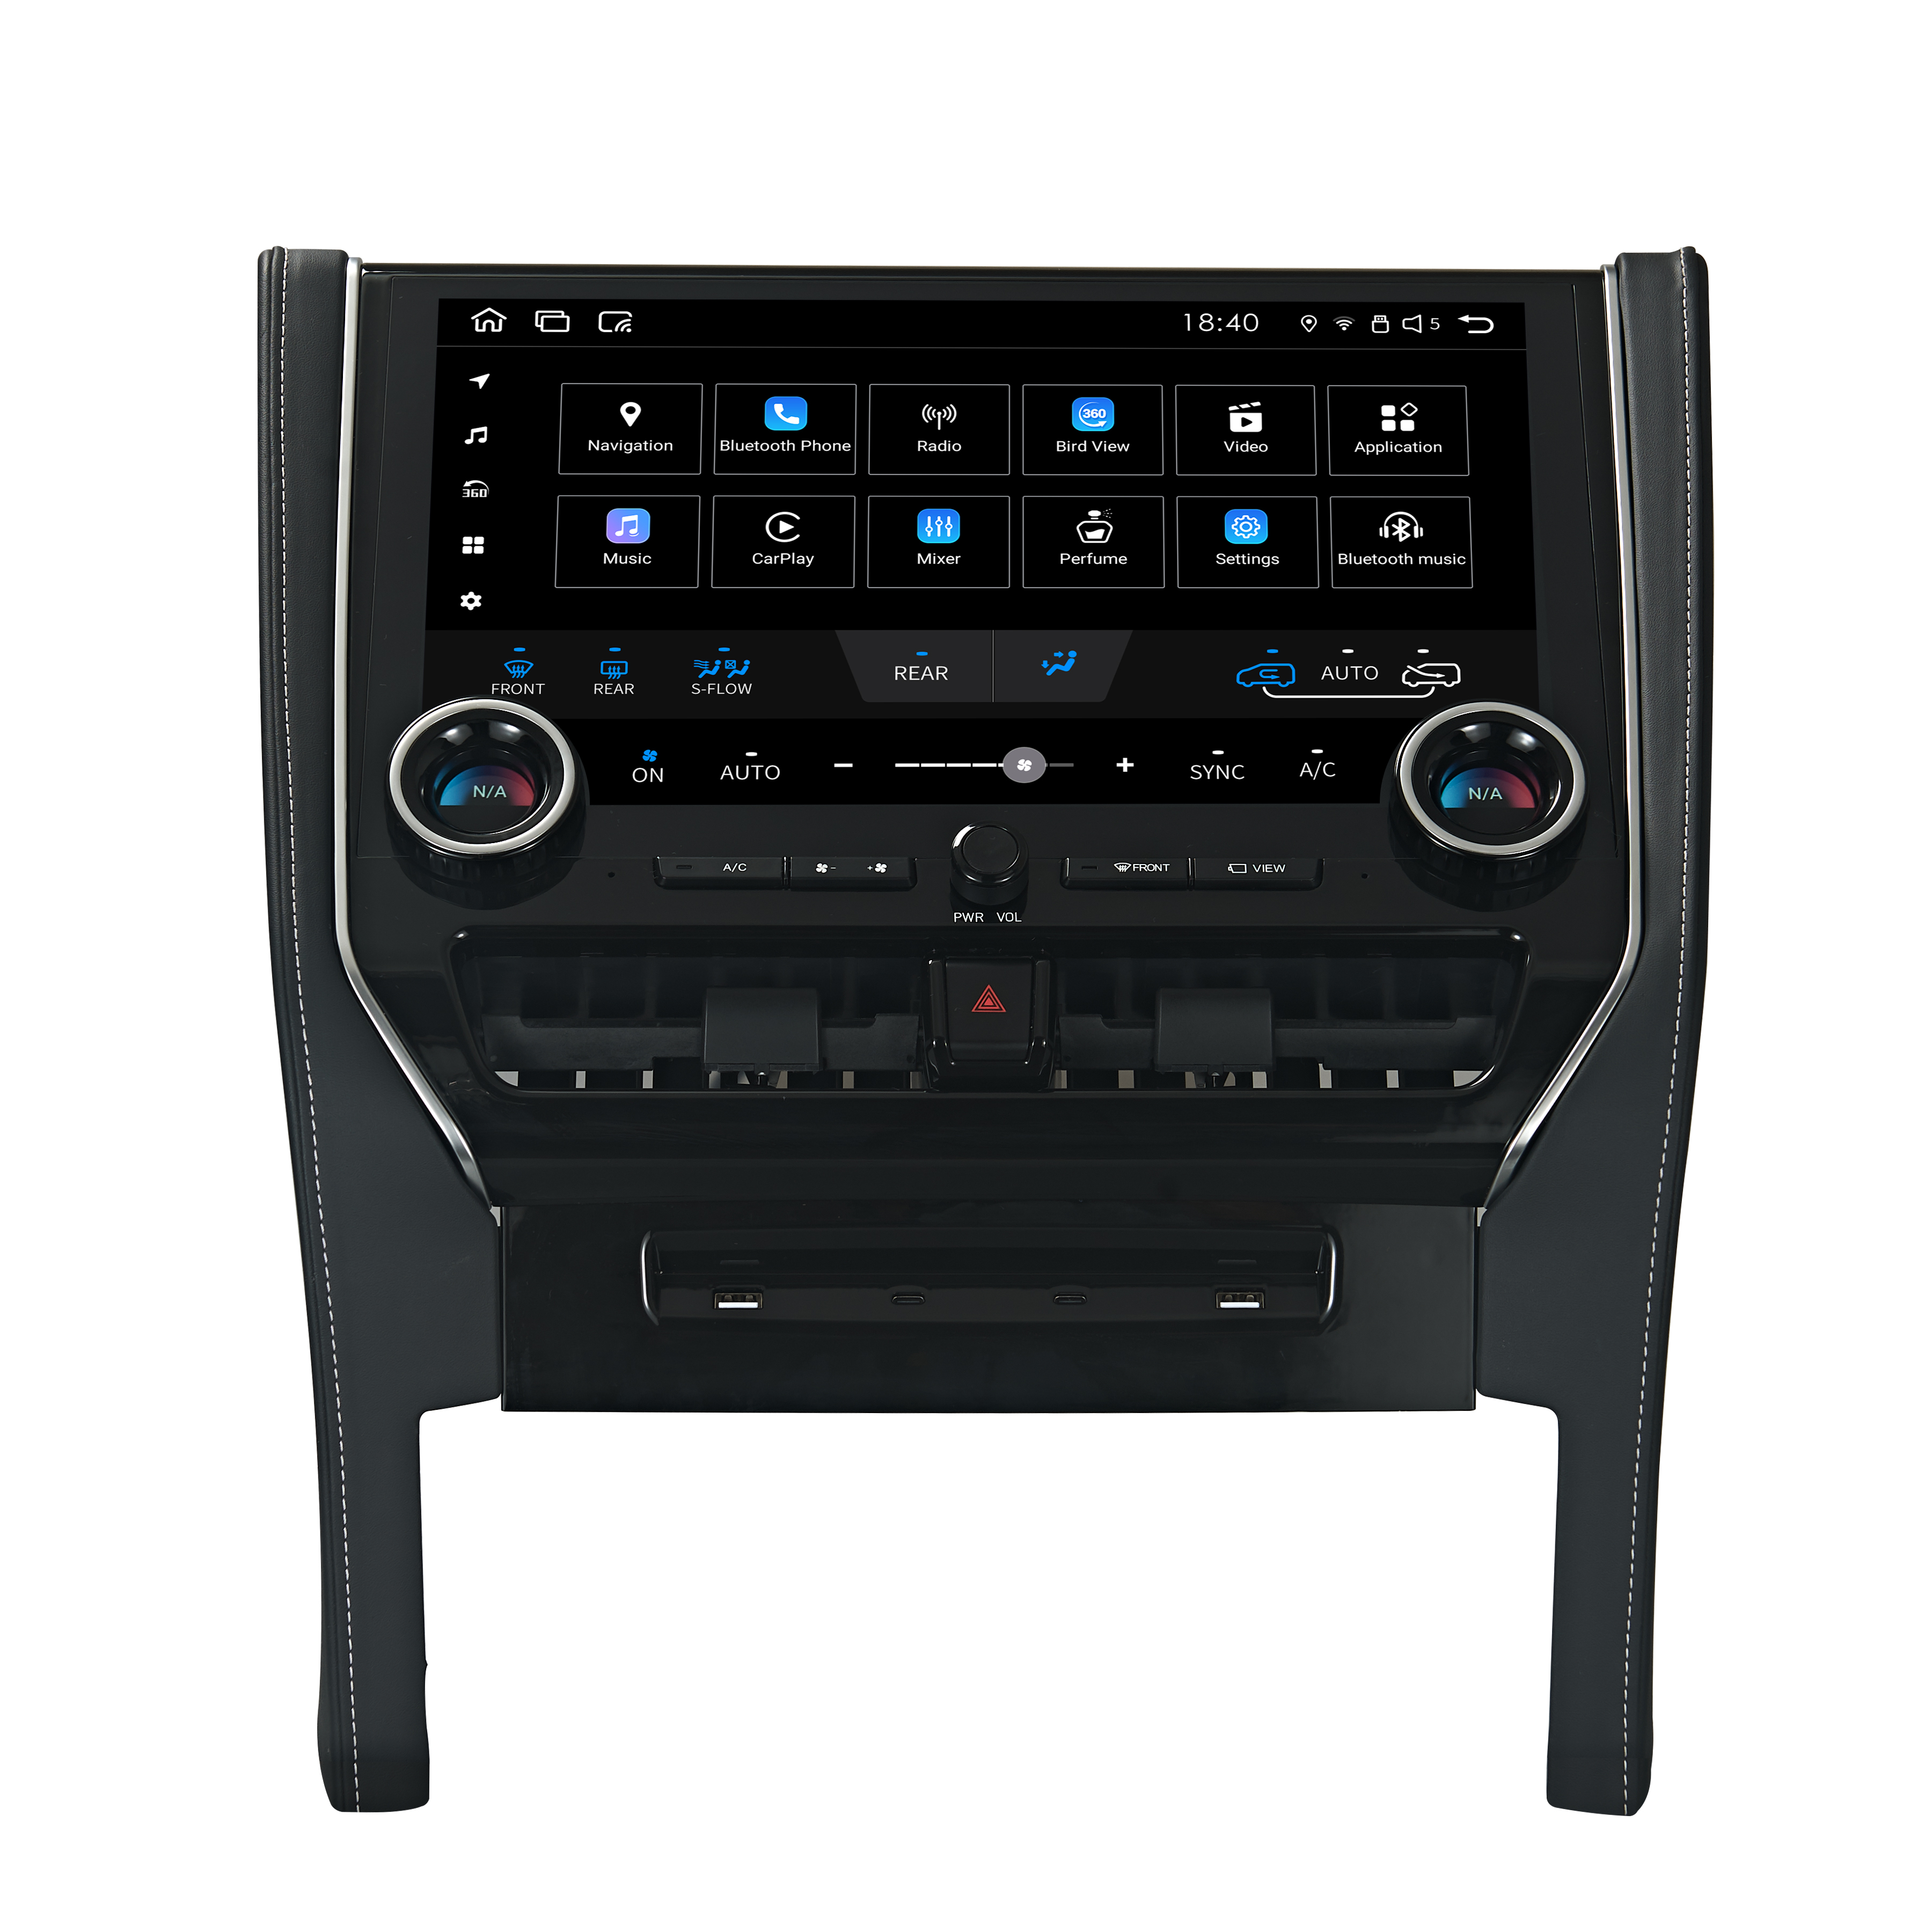
Audiosources Android Head Unit: The centerpiece of your upgrade, featuring wireless Apple CarPlay, Android Auto, and GPS navigation.
Having these tools on hand will save you time and effort during the installation process. If you don’t already own some of these items, they are readily available at most hardware or automotive stores.
Checking Compatibility with Your Vehicle
Ensuring compatibility between the Audiosources Android Head Unit and your Toyota Vellfire or Alphard is a critical step. Not all head units fit every vehicle model, so you must confirm that the unit matches your car’s specifications. Follow these steps to verify compatibility:
Identify Your Vehicle Model and Year: The Toyota Vellfire and Alphard models from 2015 to 2020 are commonly compatible with aftermarket Android head units. Double-check your car’s model year to avoid purchasing the wrong unit.
Inspect Your Dashboard Layout: Take a clear photo of your dashboard and compare it with the product images of the head unit. This helps ensure the unit will fit perfectly into your car’s existing space.
Check Wiring Requirements: Verify that the head unit supports plug-and-play installation. This feature simplifies the process by eliminating the need for extensive wiring modifications.
Consult the Seller or Manufacturer: Reach out to the retailer or manufacturer with your vehicle details. Many sellers, especially online platforms like AliExpress, offer guidance to help you choose the right product.
"Providing a photo of your dashboard to the seller can save you from compatibility issues," advises many experienced DIY installers.
By confirming these details, you can avoid unnecessary delays or complications during the upgrade. A compatible Audiosources Android Head Unit will not only fit seamlessly but also deliver the full range of features, enhancing your driving experience.
Step-by-Step Guide for Vellfire Alphard Upgrade to Android Head Unit
Removing the Factory Head Unit
To begin the Vellfire Alphard Upgrade to Android head unit, you need to remove the factory-installed head unit. This step requires precision and care to avoid damaging your vehicle's interior. Follow these steps to safely remove the old unit:
Disconnect the Battery: Start by disconnecting the negative terminal of your car battery. This ensures safety and prevents electrical issues during the process.
Remove Dashboard Panels: Use plastic trim removal tools to gently pry off the dashboard panels surrounding the head unit. Avoid using metal tools to prevent scratches or damage.
Unscrew the Factory Unit: Locate the screws securing the factory head unit in place. Use a Phillips screwdriver to remove them. Keep the screws in a safe place for later use.
Unplug Wiring Connections: Carefully disconnect all wiring harnesses and connectors attached to the factory unit. Take note of their positions to make reinstallation easier.
Extract the Head Unit: Gently pull the factory head unit out of the dashboard. If it feels stuck, double-check for any remaining screws or clips.
Removing the factory head unit is a straightforward process when you follow these steps. Take your time to ensure everything is done correctly.
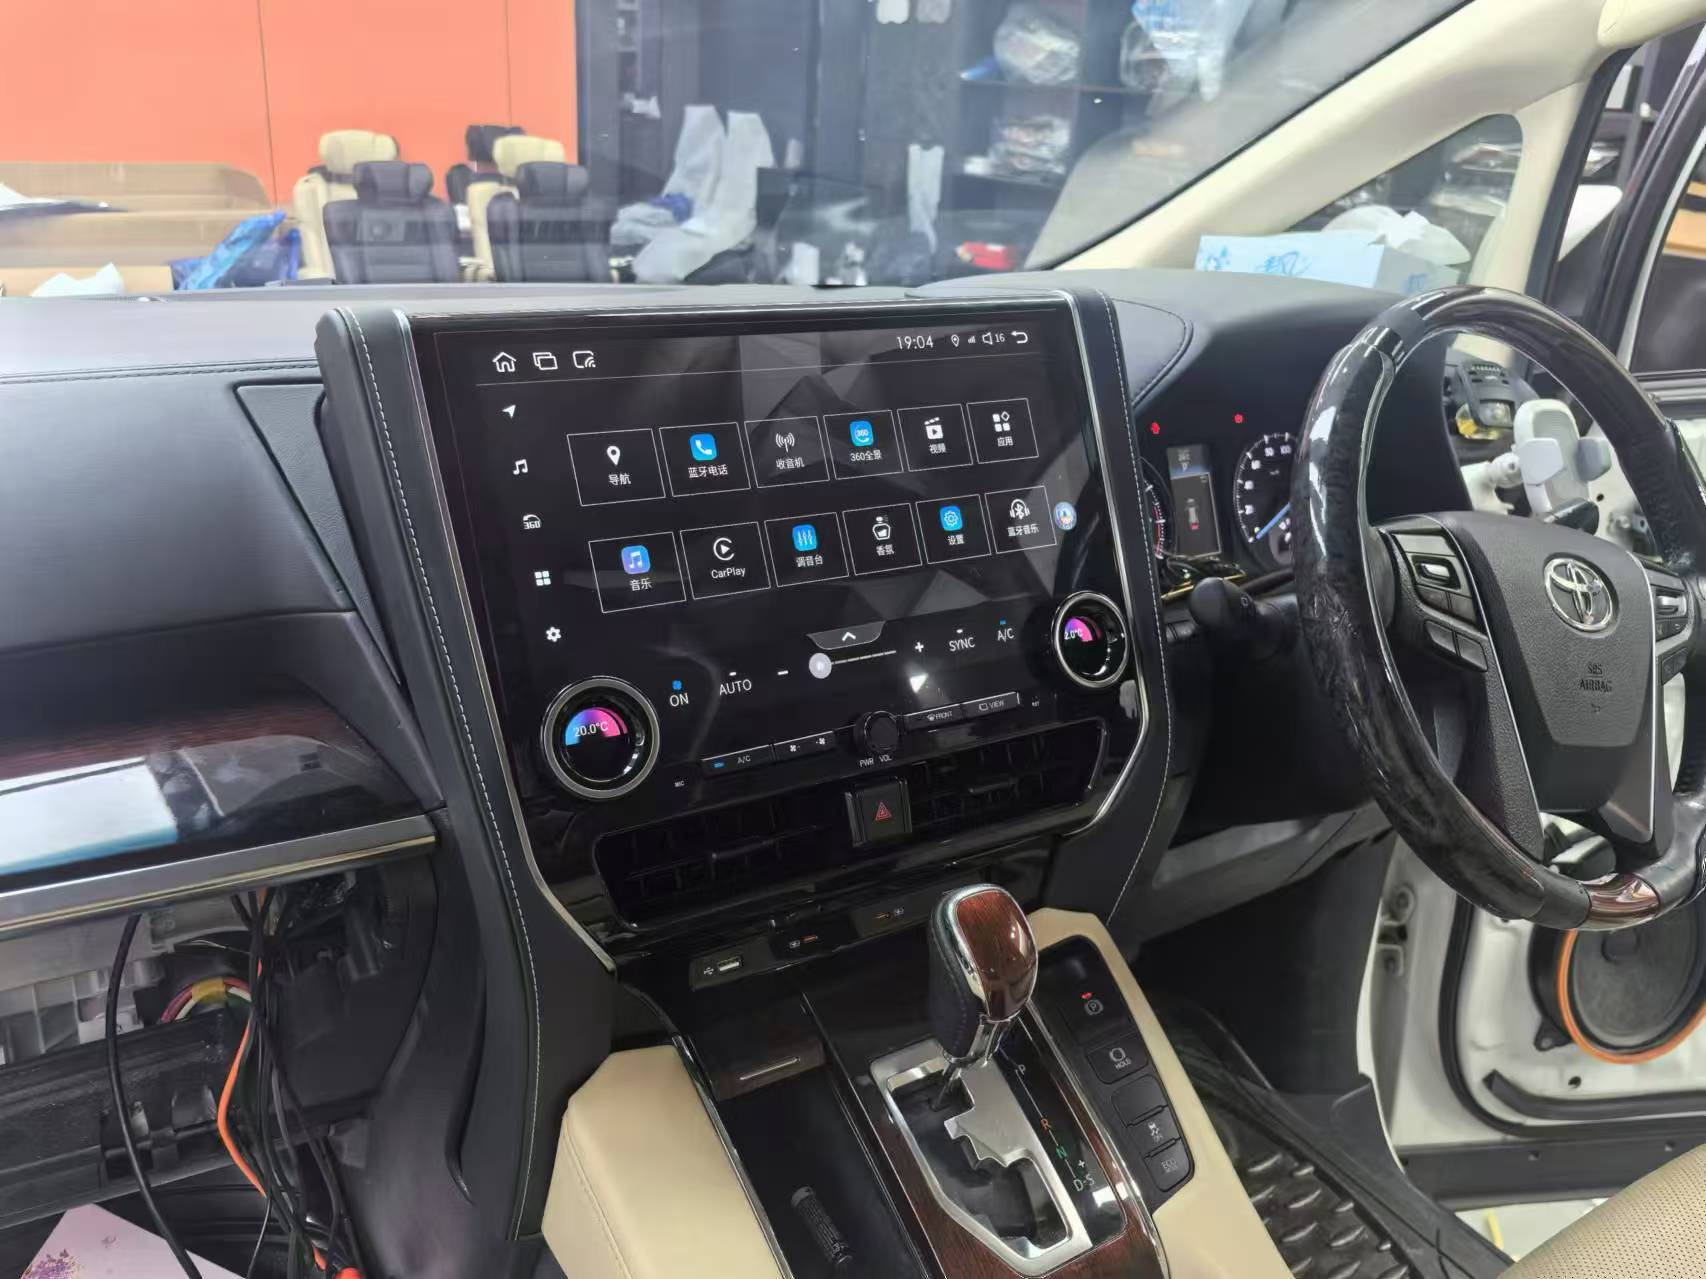
Installing the Audiosources Android Head Unit
Once the factory unit is removed, you can proceed with installing the Audiosources Android Head Unit. This step transforms your vehicle's multimedia system into a modern interface. Here's how to do it:
Prepare the New Unit: Unbox the Audiosources Android Head Unit and inspect it for any damage. Familiarize yourself with its components and connectors.
Connect the Wiring Harness: Attach the wiring harness adapter to the new head unit. Match the connectors to your vehicle's wiring system. Plug-and-play compatibility simplifies this step.
Secure the Unit in Place: Slide the new head unit into the dashboard slot. Align it properly and use the screws you removed earlier to secure it in place.
Reconnect the Battery: Reattach the negative terminal of your car battery. This powers up the new system for testing.
Reinstall Dashboard Panels: Snap the dashboard panels back into place. Ensure they fit snugly and align with the new head unit.
Installing the Audiosources Android Head Unit is a rewarding step in the Vellfire Alphard Upgrade to Android head unit. It sets the stage for a feature-rich driving experience.
Configuring and Testing the New System
After installation, configuring and testing the new system ensures everything functions as expected. Follow these steps to complete the process:
Power On the System: Turn on your vehicle and check if the new head unit powers up. The screen should display the startup interface.
Set Up Basic Features: Configure essential settings like language, time, and date. Connect your smartphone via Bluetooth or Wi-Fi to test connectivity.
Test Multimedia Functions: Play music, videos, or radio to ensure the audio and visual features work seamlessly. Explore apps like GPS navigation and wireless Apple CarPlay.
Adjust Sound Settings: Fine-tune the equalizer and sound settings to match your preferences. This enhances the audio quality for an immersive experience.
Check All Connections: Verify that all buttons, touch controls, and external devices function correctly. Address any loose connections or issues immediately.
Perform a Test Drive: Take your vehicle for a short drive to test the GPS navigation and other features in real-world conditions.
Configuring and testing the new system completes the Vellfire Alphard Upgrade to Android head unit. This step ensures you enjoy all the benefits of your upgraded multimedia system.
Troubleshooting and Tips for a Smooth Installation
Upgrading your Toyota Vellfire or Alphard with an Audiosources Android Head Unit can be a straightforward process. However, challenges may arise during installation. Understanding these common issues and knowing how to address them will help you achieve a smooth and successful upgrade.
Common Installation Challenges
Misaligned Dashboard Panels
During reassembly, the dashboard panels may not align properly. This often happens if the new head unit is not seated correctly or if clips are damaged during removal.Loose Wiring Connections
Improperly connected wires can lead to issues like no power to the head unit, poor sound quality, or malfunctioning features. This is a frequent problem when connectors are not securely fastened.Compatibility Errors
Some users encounter problems when the head unit does not fit their vehicle’s dashboard or fails to integrate with the car’s existing systems. This usually results from skipping the compatibility check before purchase.Software Glitches
After installation, the system may freeze, lag, or fail to load certain features. These glitches often stem from outdated firmware or incomplete configuration.Audio or Video Malfunctions
Poor sound quality, distorted visuals, or non-functional multimedia features can occur if the wiring harness is not correctly connected or if the system settings are not optimized.
Solutions and Best Practices
Ensure Proper Panel Alignment
Before reinstalling the dashboard panels, double-check that the head unit is securely in place. Align the clips carefully and press gently to avoid breaking them. If a panel doesn’t fit, remove it and inspect for obstructions.Secure All Wiring Connections
Use a wiring harness adapter to simplify the connection process. Double-check each connector to ensure it clicks into place. Wrap loose wires with electrical tape to prevent disconnections during use.Verify Compatibility Before Installation
Always confirm that the head unit matches your vehicle’s model and year. Provide a photo of your dashboard to the seller if needed. This step ensures the Vellfire Alphard Upgrade to Android head unit fits seamlessly and functions as intended.Update the Firmware
Check for firmware updates immediately after installation. Download and install the latest version from the manufacturer’s website to resolve potential software bugs and improve system performance.Optimize Audio and Video Settings
Access the system’s settings menu to fine-tune the audio equalizer and video display options. Adjust these settings to match your preferences and ensure the best multimedia experience.Test the System Thoroughly
After completing the installation, test every feature, including Bluetooth, GPS, and multimedia functions. Address any issues immediately to avoid complications later.
"Preparation and attention to detail are key to a successful installation," say experienced DIY enthusiasts. Taking your time and following these tips will help you avoid common pitfalls.
By addressing these challenges and applying these best practices, you can ensure a smooth and hassle-free installation. This will allow you to fully enjoy the benefits of your upgraded multimedia system.
Benefits of Upgrading to an Android Head Unit

Upgrading your Toyota Vellfire or Alphard with an Android head unit offers a range of benefits that elevate your driving experience. This section highlights the key advantages you can enjoy after completing the Vellfire Alphard Upgrade to Android head unit.
Enhanced Multimedia Functionality
An Android head unit transforms your vehicle into a multimedia powerhouse. You gain access to a wide variety of entertainment options, including music streaming, video playback, and internet radio. The system supports multiple file formats, ensuring compatibility with your favorite media.
The vibrant touchscreen display enhances your viewing experience. It delivers sharp visuals and intuitive controls, making it easy to navigate through playlists or adjust settings. Whether you’re on a long road trip or stuck in traffic, the upgraded multimedia features keep you entertained.
Modern Features and Connectivity
The Android head unit introduces modern features that improve connectivity and convenience. Wireless Apple CarPlay and Android Auto allow seamless integration with your smartphone. You can access apps, make calls, and send messages without taking your hands off the wheel.
Built-in GPS navigation ensures you never lose your way. The system provides real-time traffic updates and turn-by-turn directions, helping you reach your destination efficiently. Bluetooth and Wi-Fi connectivity enable hands-free calling and internet access, keeping you connected wherever you go.
These advanced features make the Vellfire Alphard Upgrade to Android head unit a valuable addition to your vehicle.
Improved User Experience
The user-friendly interface of an Android head unit simplifies your interactions with the system. Large icons and responsive touch controls make it easy to operate, even while driving. Customizable settings let you tailor the system to your preferences, enhancing usability.
The improved sound quality elevates your listening experience. With adjustable equalizer settings, you can fine-tune the audio to suit your taste. The system also supports external devices like USB drives and SD cards, giving you more options for media playback.
Upgrading to an Android head unit not only modernizes your vehicle but also enhances your overall driving experience. It combines functionality, convenience, and entertainment in one powerful package.
Maintenance and Care for Your Android Head Unit
Keeping the System Updated
Regular updates are essential to keep your Android head unit running smoothly. Manufacturers often release firmware updates to fix bugs, improve performance, and add new features. Staying on top of these updates ensures your system remains reliable and functional.
Check for Updates Regularly
Visit the manufacturer’s website or use the system’s built-in update feature to check for the latest firmware. Some units notify you when updates are available, but it’s a good habit to check manually every few months.Download Updates from Trusted Sources
Always download updates directly from the manufacturer’s official website or app. Avoid third-party sources to prevent installing malicious software that could harm your system.Follow Installation Instructions Carefully
Each update comes with specific instructions. Follow them step by step to avoid errors during installation. If the process seems unclear, consult the user manual or contact customer support for guidance.Back Up Your Settings
Before updating, back up your system settings and preferences. This precaution ensures you can restore your configurations if the update resets them.
"I once updated my Android head unit without backing up my settings, and I had to reconfigure everything from scratch," shared a user on an online forum. Always back up to save time and effort.
By keeping your system updated, you enhance its performance and longevity. Updates also ensure compatibility with the latest apps and features, giving you the best experience possible.
Cleaning and Protecting the Screen
The touchscreen is a vital part of your Android head unit. Keeping it clean and protected not only improves visibility but also extends its lifespan. Proper care prevents scratches, smudges, and other damage.
Use a Microfiber Cloth
Clean the screen with a soft microfiber cloth to remove dust and fingerprints. Avoid using paper towels or rough materials that can scratch the surface.Apply a Screen Protector
Install a high-quality screen protector to shield the display from scratches and smudges. Many protectors also reduce glare, improving visibility in bright conditions.Avoid Harsh Cleaning Agents
Use a screen-safe cleaning solution or a mixture of water and mild soap. Spray the solution onto the cloth, not directly on the screen, to prevent liquid from seeping into the device.Keep the Screen Free of Sharp Objects
Avoid placing sharp or heavy objects near the screen. Even a small scratch can affect the touch sensitivity and overall appearance.Clean Regularly
Make it a habit to clean the screen weekly or whenever it looks dirty. Regular maintenance keeps the display clear and responsive.
"I neglected cleaning my head unit’s screen for months, and now it has permanent smudges," admitted a car owner in a discussion thread. Consistent care prevents such issues.
By following these steps, you can maintain a pristine and functional screen. A clean and protected display enhances your interaction with the system, ensuring a better driving experience.
Upgrading your Toyota Vellfire or Alphard with an Audiosources Android Head Unit transforms your vehicle into a modern multimedia hub. This Vellfire Alphard Upgrade to Android head unit enhances your driving experience with advanced features like seamless smartphone integration, immersive entertainment, and reliable navigation. By following the step-by-step guide, you can complete the installation with ease. Take action today and enjoy the convenience, connectivity, and functionality that this upgrade brings to your car. Elevate your journeys and make every drive more enjoyable.
FAQ
What is an Android head unit, and why should you upgrade?
An Android head unit is a multimedia system that runs on the Android operating system. It replaces your car's factory-installed head unit, offering advanced features like GPS navigation, wireless Apple CarPlay, Android Auto, and internet connectivity. Upgrading enhances your driving experience by providing modern functionality, better sound quality, and seamless smartphone integration.
Is the Audiosources Android Head Unit compatible with all Toyota Vellfire and Alphard models?
The Audiosources Android Head Unit is compatible with most Toyota Vellfire and Alphard models from 2015 to 2020. However, you should confirm compatibility by identifying your vehicle's model year and inspecting your dashboard layout. Providing a photo of your dashboard to the seller ensures you select the correct unit for your car.
Can I install the Android head unit myself, or do I need professional help?
You can install the Android head unit yourself if you have basic technical skills and the right tools. The process involves removing the factory unit, connecting the new system, and configuring it. Many units offer plug-and-play compatibility, simplifying the installation. If you feel unsure, hiring a professional installer ensures a seamless setup.
How long does it take to install the Audiosources Android Head Unit?
The installation process typically takes 1 to 2 hours for most users. This depends on your experience and familiarity with car electronics. Preparing the necessary tools and following a step-by-step guide can help you complete the upgrade efficiently.
What should I do if the system doesn’t power on after installation?
If the system doesn’t power on, check the wiring connections first. Ensure all connectors are securely fastened and the wiring harness adapter is properly attached. Verify that the car battery is reconnected. If the issue persists, use a multimeter to test the voltage or consult the manufacturer for troubleshooting support.
Will upgrading to an Android head unit void my car’s warranty?
Upgrading to an Android head unit may not void your car’s warranty if you follow proper installation procedures. Using a plug-and-play wiring harness avoids modifications to the vehicle’s original wiring, reducing the risk of warranty issues. Check your car’s warranty terms or consult your dealer for clarification.
How do I update the firmware on my Android head unit?
To update the firmware, visit the manufacturer’s official website or use the system’s built-in update feature. Download the latest firmware version and follow the provided instructions for installation. Always back up your settings before updating to avoid losing your configurations.
Can I use my smartphone apps on the Android head unit?
Yes, the Android head unit supports smartphone apps through wireless Apple CarPlay and Android Auto. You can access navigation, music streaming, messaging, and other apps directly on the head unit’s screen. This feature enhances convenience and keeps you focused on driving.
What should I do if the touchscreen becomes unresponsive?
If the touchscreen becomes unresponsive, restart the system first. Check for any physical damage or dirt on the screen. Clean it with a microfiber cloth and ensure no sharp objects are nearby. If the issue continues, update the firmware or contact the manufacturer for technical support.
How can I maintain the performance of my Android head unit?
To maintain performance, keep the system updated with the latest firmware. Clean the screen regularly with a microfiber cloth and use a screen protector to prevent scratches. Avoid exposing the unit to extreme temperatures. Test all features periodically to ensure everything functions correctly.
See Also
2024 Upgrade: Transform Your Mercedes Vito Radio to Android 12
Your Comprehensive Guide to Selecting Top Motorcycle Carplay Screens
2024 Audiosources Motorcycle Carplay Screen Versus Competitors: A Comparison
2024 Discover the Top Touch Screen Motorcycle Carplay Options
Enhance Your Motorcycle Experience with Premium Apple CarPlay Screens
Follow Us
Audiosources shenzhen Limited is a high technlogy manufacture which was founded in 2006 yeas. The company's main products include Android car dvd player, carplay ai box, car climate panel, carplay screen,ect.
We have our own R&D team,can delop the OEM and ODM projects for different demand. we already did ODM products for Mecerdes Benz, Volkswagen, Toyota brand cars. welcome to inquiry and order. Thanks.
Address
3rd Floor, Building 1, Haopeng Wisdom Park, No. 141-1 Furui Road, Xintian Community, Fuhai Street, Baoan District, Shenzhen,Guangdong , China
Contacts
sale3@audiosources.net

© Copyright 2024 My First Blog - All Rights Reserved.